Looking for a craft that sparks imagination, recycles household items, and keeps kids entertained? Enter the robot toilet paper roll craft! This eco-friendly project is the perfect blend of creativity and sustainability. With just a few simple materials, children can transform empty toilet paper rolls into adorable, expressive robot friends.
Whether you’re a teacher planning a classroom activity or a parent looking for an afternoon project, this craft brings endless possibilities for personalization and play. Let’s dive into everything you need to know to bring your robot to life.
Crafting with Purpose and Play
Why Kids Love Robot Crafts
There’s something magical about robots. They’re fun, futuristic, and full of personality. When kids craft robots, they’re not just making something cute—they’re imagining a world of possibilities. What does their robot do? Is it helpful, silly, or high-tech? This craft gives children a chance to dream, create, and problem-solve in a tactile way.
Crafts like this also promote important developmental skills. Wrapping, gluing, and twisting materials help refine fine motor skills. Choosing colors, decorations, and expressions supports decision-making and artistic expression. Plus, it’s a sneaky way to talk about recycling and the basics of robotics.
Benefits of Recycled Crafts
Recycled crafts are a win-win: they save money and teach kids about the importance of reusing materials. Using toilet paper rolls for crafting encourages children to see the creative potential in everyday items. Rather than tossing them out, these cardboard tubes become the foundation for storytelling and invention.
Plus, using materials you already have at home makes this project low-cost and easy to set up. No fancy tools required—just some household scraps, a little glue, and a lot of imagination.
How to Make a Robot Toilet Paper Roll Craft
Ingredients
Here’s what you’ll need for one robot:
- 1 empty toilet paper roll
- Colored paper or cardstock (assorted colors)
- Aluminum foil
- 2 googly eyes
- Pipe cleaners (2–3)
- Small pom-poms
- Buttons or stickers
- Scissors
- Glue or tape
- Black marker
")
Optional extras: felt, rhinestones, foam shapes, or any crafty bits you have on hand!
Directions
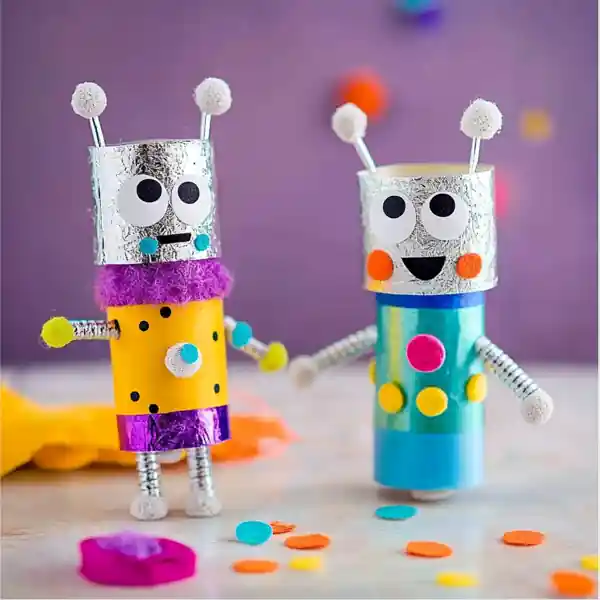
- Wrap the Top in Foil
Tear a small piece of aluminum foil and wrap it around the top half of the toilet paper roll. This forms the robot’s shiny metal head. Secure it in place with tape or glue. - Cover the Body with Paper
Cut a strip of colorful paper to fit the bottom half of the roll. Wrap and glue it in place to create the robot’s body. Choose bold colors or even patterned cardstock for a high-tech look. - Attach the Eyes
Glue two googly eyes to the foil section. Play with the spacing to create a serious, silly, or surprised expression. - Draw a Mouth
Use a black marker to draw a grid-like or lined mouth. This gives the robot a digital vibe. Add other face details if desired, like eyebrows or cheek dots. - Decorate the Chest
Stick buttons, small pom-poms, or stickers onto the paper body to resemble control buttons. This is a great chance to talk about what each “button” might do! - Add Arms
Cut two pieces of pipe cleaner to your desired length. Twist them into zigzags, coils, or loops. Tape or glue them to the sides of the roll to become robot arms. - Make an Antenna
Insert a pipe cleaner into the top of the robot’s head, securing it with tape inside the roll. Glue a pom-pom on the end for a fun, quirky antenna. - Personalize It
Use felt shapes, gems, stickers, or whatever else you have to give your robot a one-of-a-kind look. Give it a name and personality!
Fun Ideas and Learning Opportunities
")
Expand the Craft with a Robotics Chat
Once the robots are complete, take a few moments to talk about real-life robots. Ask the kids what robots do in factories, hospitals, or space. Encourage them to imagine what their homemade robot could do. This opens the door to STEM discussions and gets young minds buzzing with curiosity.
You can even write stories or draw scenes where their robot plays a starring role. Some kids might want to build a cardboard robot city or create a short skit featuring their robot characters.
Host a Robot Crafting Party
This craft is ideal for birthday parties, classroom centers, or themed playdates. Set up a crafting station with pre-cut materials, offer a few finished examples, and let the kids’ creativity run wild. For added fun, play robot-themed music or movies in the background, like WALL-E or Big Hero 6.
Don’t forget to display the finished robots on a shelf or window ledge—they make adorable decorations and conversation starters.
Print
Turn Trash into Treasure: How to Make a Robot Toilet Paper Roll Craft
- Total Time: 25 minutes
- Yield: 1 robot per set of materials
Description
A fun and eco-friendly craft that turns toilet paper rolls into adorable, personalized robot figures using simple household materials.
Ingredients
1 empty toilet paper roll
Colored paper or cardstock
Aluminum foil
2 googly eyes
Pipe cleaners
Small pom-poms
Buttons or stickers
Scissors
Glue or tape
Black marker
Instructions
Wrap the top half of the roll in aluminum foil to create the robot’s head.
Cover the lower half with colored paper for the body.
Glue googly eyes onto the foil section.
Draw a mouth with a black marker.
Decorate the body with buttons, pom-poms, or stickers.
Attach pipe cleaner arms on each side.
Insert a pipe cleaner antenna with a pom-pom tip into the top.
Add any extra decorations to personalize your robot.
Notes
Ideal for ages 4 and up with adult supervision for cutting and gluing.
- Prep Time: 5 minutes
- Cook Time: 20 minutes
- Category: Kids Crafts
- Method: Crafting
- Cuisine: N/A