Say goodbye to buzzing nuisances in your home with a simple solution that requires no chemicals, no harsh smells, and no fancy gadgets. This DIY Fly & Mosquito Trap is easy to make, incredibly effective, and safe to place anywhere from your kitchen counter to your bathroom shelf. If you’re tired of swatting at flies or dodging mosquito bites, it might be time to try this natural and budget-friendly method.

In this guide, you’ll learn how to make your own insect trap using ingredients you already have at home. It takes just a few minutes to prepare, and once it’s set up, you can sit back while it does the work for you.
Why This Trap Works
A Scent They Can’t Resist
Flies and mosquitoes are naturally drawn to strong scents, especially those that hint at food or sweetness. The blend of vinegar, scented shampoo, and oil is irresistible to them. The shampoo adds a fragrant lure, while the vinegar mimics the scent of fermenting fruit, a known attractant for many flying insects.
A Surface They Can’t Escape
What makes this trap so effective isn’t just the smell—it’s the texture. Once the insects land on the oily, soapy surface, they become stuck. The combination of oil and shampoo prevents them from flying away, making this a trap and not just an attractant.
What You Need and How to Use It
Ingredients
- ½ cup vinegar (white or apple cider)
- ½ cup olive oil (or any vegetable oil)
- ½ cup shampoo (any scented kind works best)
Directions
- Mix Ingredients: In a cup or small bowl, combine the vinegar, olive oil, and shampoo. Stir gently to mix the ingredients well, but try to avoid creating foam.
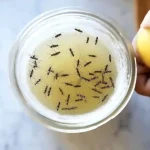
- Set the Trap: Pour the mixture into an open container—a shallow dish or jar works great. Place it in a spot where you’ve seen flies or mosquitoes gather.
- Let It Work: Leave the trap undisturbed. The insects will be drawn to the scent, land on the mixture, and become trapped.
- Refresh as Needed: Replace the mixture every few days or when the surface becomes full of insects.
💡 Pro Tip: Want to supercharge the effectiveness? Put the trap near fruit bowls, trash cans, sinks, or windows—basically, any hotspot for bugs in your home.

Tips, Variations, and Storage
Customizing Your Trap
- Use What You Have: Don’t have olive oil? Canola, sunflower, or even used cooking oil can work just as well.
- Boost the Scent: Add a drop of essential oil (like lemon or eucalyptus) if you want to enhance the trap’s smell.
- Cover Smart: If you’re worried about pets or kids, you can cover the container with plastic wrap and poke small holes—insects will still get in, but it’s safer.
Storing the Mix
- You can pre-mix the trap solution and store it in a sealed jar. Just shake gently before pouring it into a container for use.
- Store extra solution in a cool, dry place away from direct sunlight.
This trap is a low-effort, high-reward method to cut down on unwanted insects. It’s safe, eco-friendly, and customizable, making it the perfect choice for every room in your home.
Banish Bugs Naturally: DIY Fly & Mosquito Trap That Really Works
- Total Time: 5 minutes
- Yield: 1 trap
Description
Say goodbye to pesky flies and mosquitoes with this simple DIY trap using vinegar, oil, and shampoo. Chemical-free and highly effective!
Ingredients
½ cup vinegar
½ cup olive oil (or other vegetable oil)
½ cup scented shampoo
Instructions
Combine vinegar, olive oil, and shampoo in a small container.
Stir gently to mix without foaming.
Pour into an open dish and place where insects are active.
Let it sit and work—insects will be drawn in and trapped.
Replace the mixture every few days or when full.
Notes
For added safety around pets or kids, cover with plastic wrap and poke small holes.
- Prep Time: 5 minutes
- Cook Time: 0 minutes
- Category: DIY Home Solutions
- Method: No-Cook
- Cuisine: N/A