Who knew that making your own kinetic sand could be so simple and satisfying? Whether you’re looking for a fun rainy-day activity or a creative way to keep little hands busy, DIY kinetic sand is the perfect sensory craft. This soft, squeezable material offers endless possibilities for imaginative play, fine motor development, and even stress relief. Let’s dive into how you can whip up your own batch right at home with just a few basic ingredients.

Why Make DIY Kinetic Sand?
Great for Sensory Play and Creativity
Kinetic sand has a unique texture that’s both dry and moldable. It flows through your fingers like liquid but holds its shape when pressed. This makes it a fantastic material for open-ended play. Kids can mold it into castles, shapes, or simply enjoy the soothing sensation of running it through their hands. It encourages creativity and sensory exploration without the mess of traditional sand.
Budget-Friendly and Customizable
Store-bought kinetic sand can be pricey, especially if you want multiple colors or large quantities. Making your own version is not only affordable but also customizable. Want purple sparkly sand? Just add food coloring and glitter. Prefer a natural look? Skip the extras. You control the ingredients, making it a safe and fun alternative for home use.
How to Make DIY Kinetic Sand
Ingredients
- 2 cups play sand
- 1 cup cornstarch
- ½ cup dish soap
- Optional: a few drops of food coloring or non-toxic paint
- Optional: glitter for sparkle fun
Directions
- Combine Dry Ingredients: In a large mixing bowl, combine the play sand and cornstarch. Stir until well blended to ensure even texture.
- Add Dish Soap: Pour in the dish soap and mix thoroughly. You can use a spatula or dive in with your hands. The mixture should start to clump together and feel moldable.
- Add Color (Optional): If you want a vibrant batch, add a few drops of food coloring or non-toxic paint. Mix until the color is evenly distributed.
- Add Glitter (Optional): For a magical, sparkly twist, sprinkle in your glitter and mix again.
- Play & Store: Your kinetic sand is now ready for action! Shape it, squish it, and have fun. When you’re done, store it in an airtight container to keep it soft and reusable.

Tips, Variations, and Storage
Tips for the Perfect Batch
- Use fine play sand: The finer the sand, the smoother the texture of your kinetic sand.
- Adjust consistency: If the mixture feels too wet, add a bit more sand. If it’s too dry, a tiny splash of water or extra dish soap will help.
- Non-toxic is key: Always choose child-safe, non-toxic ingredients, especially if younger kids will be playing.
Fun Variations to Try
- Scented Sand: Add a drop of essential oil like lavender or peppermint for a soothing or invigorating experience.
- Glow-in-the-Dark Sand: Mix in glow powder or glow-in-the-dark paint for nighttime fun.
- Seasonal Themes: Create orange sand with pumpkin spice for fall, or blue sand with snowflake glitter for winter.
Creating your own kinetic sand is a fantastic way to blend playtime with learning and creativity. It’s easy, affordable, and offers endless entertainment for kids and adults alike.
Print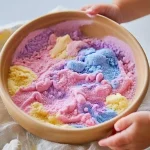
DIY Kinetic Sand – Squishy, Moldable, Mess-Free Fun!
- Total Time: 10 minutes
- Yield: 1 batch
Description
Make your own soft, squeezable kinetic sand at home! Great for sensory play, creativity, and endless hands-on fun.
Ingredients
2 cups play sand
1 cup cornstarch
½ cup dish soap
Optional: a few drops of food coloring or non-toxic paint
Optional: glitter for sparkle fun
Instructions
Combine Dry Ingredients: In a large bowl, mix the play sand and cornstarch until evenly blended.
Add Dish Soap: Pour in the dish soap and mix thoroughly with your hands or a spatula.
Add Color (Optional): Add food coloring or paint for a colorful twist. Mix until evenly colored.
Add Glitter (Optional): For some extra sparkle, sprinkle in glitter and stir to combine.
Play & Store: Your kinetic sand is ready! Store in an airtight container to keep it soft and moldable.
Notes
Use fine play sand for best texture. Store in a cool, dry place and knead before each use if it begins to dry out.
- Prep Time: 10 minutes
- Cook Time: 0 minutes
- Category: Crafts
- Method: No-Cook
- Cuisine: DIY