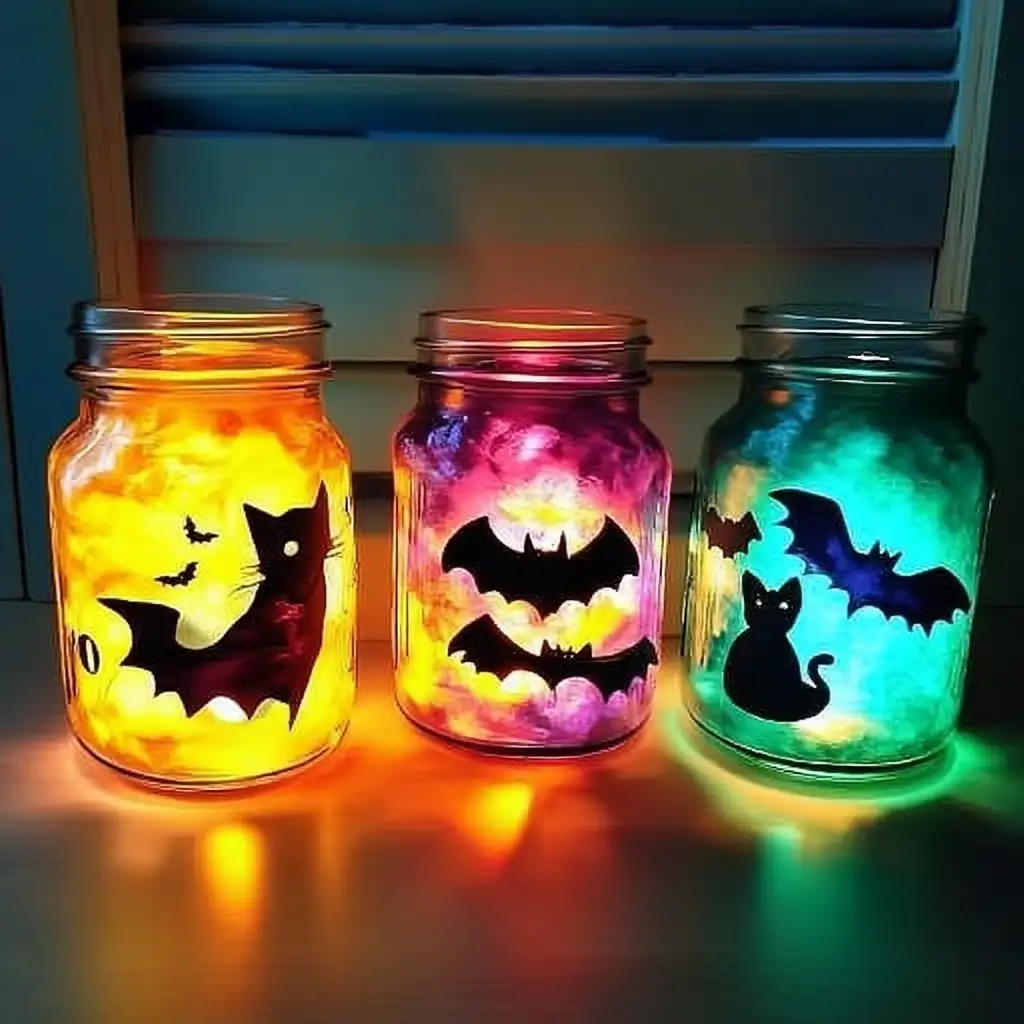
Halloween isn’t just about costumes and candy—it’s also the perfect time to get crafty. One of the simplest and most magical decorations you can create are spooky tissue paper jars. These glowing, colorful lanterns made from recycled glass jars add an eerie ambiance to any Halloween setup. Whether you’re throwing a haunted house party or just want to spruce up your porch, these DIY jars are a family-friendly activity with spectacular results.
Let’s walk you through everything you need to know to make these delightful Halloween luminaries.
Why You’ll Love Making Spooky Tissue Paper Jars
Kid-Friendly and Budget-Friendly
One of the best things about this craft is that it’s incredibly easy and affordable. You likely already have many of the supplies at home, especially if you’re into crafting or recycling. Kids love this project because it’s hands-on, a little messy, and all about creativity. There’s no wrong way to decorate these jars, making it a low-pressure activity that still delivers high impact.
Customizable for Any Halloween Theme
Whether you’re going for cute ghosts, classic jack-o’-lanterns, or full-on fright night, you can tailor your jars to match. By simply changing the tissue paper colors and silhouette designs, you can adapt this craft to suit any spooky style. Orange and black for a traditional Halloween look, green and purple for something more whimsical—your options are endless.
What You’ll Need and How to Create Them
Ingredients
Before you start, gather the following items:
- Glass jars (mason jars or old food jars work great)
- Tissue paper (assorted Halloween colors: orange, purple, green, etc.)
- PVA glue (or any clear-drying craft glue)
- Black construction paper or black vinyl (for silhouettes)
- Scissors
- Paintbrush or sponge brush
- LED tea lights or fairy lights
Directions
Follow these steps to bring your spooky jars to life:
- Prep the Jars: Clean and dry your glass jars thoroughly to remove any dust, grease, or labels. This helps the glue stick better.
- Cut the Tissue Paper: Tear or cut the tissue paper into small squares or irregular shapes, approximately 1–2 inches in size. This gives a beautiful stained-glass effect when the light shines through.
- Glue and Decorate: Use a paintbrush or sponge brush to apply a thin layer of PVA glue to the outside of the jar. Start sticking the tissue paper pieces all over the jar, overlapping them slightly. Cover the entire surface for the best effect.
- Seal It Up: Once the jar is fully covered, apply another thin layer of PVA glue over the top of the tissue paper. This seals it in place and gives a nice finish. Let the jars dry completely, which can take up to 2 hours.
- Add the Spooky Silhouettes: While the jars are drying, cut out spooky Halloween shapes from black construction paper or vinyl. Classic shapes include bats, cats, witches, and ghosts. Once your jar is dry, glue or stick these silhouettes onto the outside.
- Light It Up: Drop in an LED tea light or a small string of fairy lights. Avoid real candles as they can be a fire hazard, especially with paper and glue.
- Display Your Masterpiece: Place your jars in a dark area like a porch, windowsill, or centerpiece to see them truly shine. The layered tissue paper and backlit silhouettes create a magical Halloween glow.
Crafting Tips and Creative Variations
")
Design Ideas to Get You Started
Need some inspiration? Here are a few themes you could try:
- Pumpkin Patch: Use only orange tissue paper and add jack-o’-lantern faces.
- Witch’s Brew: Use green and purple paper with silhouettes of cauldrons and broomsticks.
- Haunted Graveyard: Go with dark blues and blacks, and add tombstones or ghost shapes.
Mix and match designs if you’re creating multiple jars for a varied display.
Pro Tips for the Best Results
- Use a foam brush for even glue application and fewer streaks.
- Go easy on the glue: Too much can make the paper soggy and tear.
- Let kids cut their own shapes with safety scissors—it adds a charming homemade touch.
- Don’t rush the drying time: The glue needs to dry thoroughly to avoid smudging the silhouettes.
Crafting these spooky jars is not just about the final product. It’s about the experience—cutting, gluing, laughing, and getting into the Halloween spirit.