There’s something undeniably magical about turning everyday items into beautiful, creative masterpieces. One of the most delightful ways to do this is by learning how to paint with bubbles. This fun and easy project is perfect for kids and adults alike, turning your table into a mini art studio bursting with color and excitement.
This method blends art and science, inviting exploration and imaginative design with every pop of color-filled bubbles. Whether you’re planning a rainy-day activity, a weekend art session, or a classroom experiment, bubble painting is sure to inspire joy and creativity.
Why Bubble Painting is Perfect for Everyone
Great for All Ages
Bubble painting is one of those rare crafts that transcends age groups. Young children enjoy the thrill of blowing bubbles and watching the colorful splashes appear, while older kids and adults can explore intricate patterns and layered designs.
Because it requires minimal setup and supervision, it’s ideal for family projects or group activities. Plus, it’s a wonderful introduction to concepts like color mixing, surface tension, and air pressure in a hands-on and entertaining way.
Low-Cost and High Reward
One of the best parts about bubble painting is that it uses materials you likely already have at home. A few kitchen staples combined with paper and coloring agents can turn into an afternoon of artistic fun. It’s budget-friendly and leaves plenty of room for customization depending on what you have on hand.
Getting Started with Bubble Painting
Ingredients
- Small cups or bowls
- Liquid watercolors or food coloring
- Dish soap
- Water
- Straws
- White cardstock or watercolor paper
- Tray or table covering
")
Directions
- Gather all your ingredients and materials on a clean, flat surface. Cover the table with a tray or table covering to protect it from spills.
- In each small cup or bowl, combine 1/4 to 1/2 cup of water with 1 to 2 squirts of dish soap. Stir gently to mix, avoiding creating too many bubbles.
- Add 3 to 5 drops of liquid watercolors or food coloring to each cup and stir carefully to incorporate the colors without over-foaming the mixture.
- Take a piece of white cardstock or watercolor paper and place it on the tray, ensuring it is ready to receive the colorful bubbles.
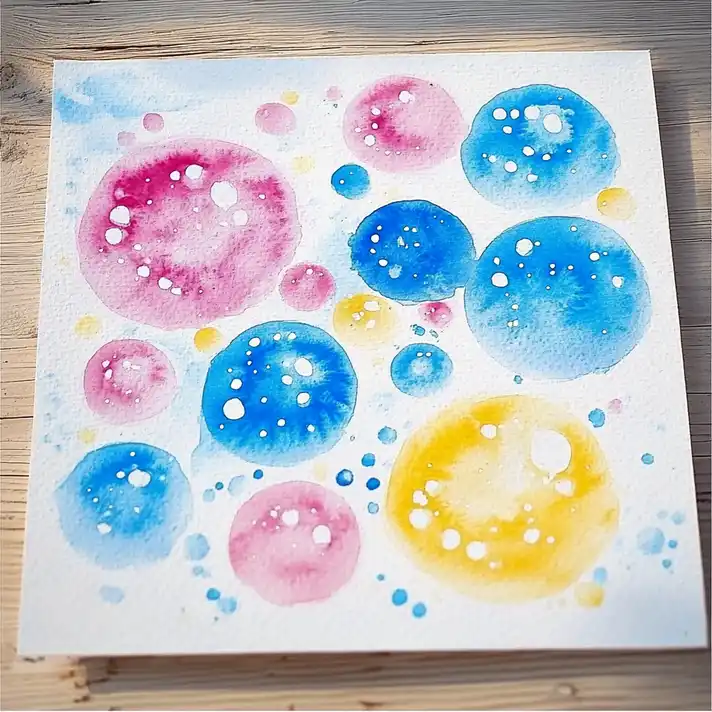
- Using a straw, gently blow into the bubble solution in the cup to create bubbles. When the bubbles rise, allow them to touch the paper so that they pop and leave colorful prints.
- After creating designs with one color, rinse the straw in water before moving on to the next color to avoid mixing the hues unintentionally.
- Repeat the process with different colors, creating layers and patterns until you achieve your desired artwork.
- Once finished, set the artwork aside and let the paintings dry for 1 to 2 hours.
- After drying, clean up by rinsing the cups, straws, and any utensils used, and wipe the tray to ensure a tidy workspace.
Tips, Tricks, and Creative Twists
")
Artistic Variations
Want to take your bubble painting up a notch? Try using paper with textures or varying absorbency. Watercolor paper, cardboard, and even fabric can yield different effects. You can also adjust the amount of soap or coloring to influence the size and boldness of the bubbles.
Another creative option is to layer your paintings. Once your first layer has dried, you can add new colors and patterns on top, creating depth and dimension. This method is especially useful for abstract art projects or making custom backgrounds for greeting cards.
Educational and Fun
Bubble painting is also a sneaky way to add educational value to playtime. Talk about how bubbles form, why they pop, and how colors mix when they overlap. This opens up opportunities for informal learning in both home and classroom settings.
Experimenting with primary colors and watching them blend on paper helps kids understand the basics of color theory in a hands-on way. Plus, it’s a great sensory activity that can be calming and therapeutic.