If you’re looking for a fun, educational, and creative activity that will amaze kids and adults alike, making sugar and glue crystal geodes is a fantastic choice. This project turns simple household ingredients into dazzling, sparkling creations that resemble natural geodes. Not only does it provide an engaging hands-on experience, but it’s also an exciting way to introduce basic science concepts like crystallization.
These DIY geodes are perfect for school projects, science experiments, or just a rainy-day craft. With a little sugar, glue, and creativity, you can create sparkling gems that add a magical touch to any room. Ready to get started? Let’s dive into the steps for crafting these beautiful crystal wonders.
What Are Sugar and Glue Crystal Geodes?
Before jumping into the process, let’s understand what makes these geodes so special. Natural geodes form over thousands of years in hollow rocks, creating crystals inside due to mineral-rich water. With this project, we replicate the process using sugar and glue for quick results. This simple experiment helps kids understand the science of crystal growth while giving them an artistic outlet to express their creativity.
Why Kids Love This Activity
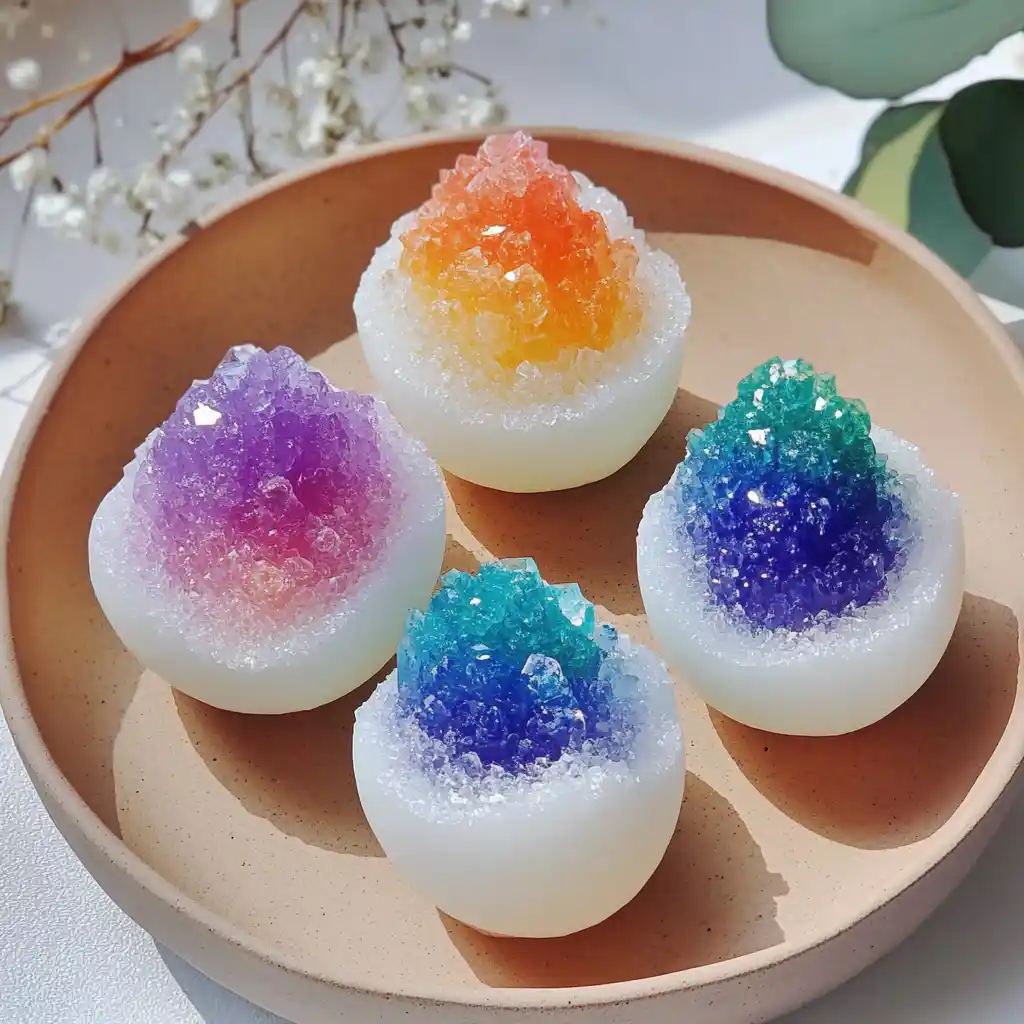
Kids adore these geodes because they look like real gemstones. Watching crystals grow inside a shell or cup feels magical and satisfying. Plus, adding different food colors means every geode is unique and vibrant.
Benefits of Making Sugar Geodes
This activity isn’t just pretty—it’s educational too. Children learn:
- How crystals form through evaporation and saturation.
- The importance of patience during the growth process.
- Artistic skills when coloring and designing their geodes.
How to Make Sugar and Glue Crystal Geodes at Home
Creating sugar geodes is surprisingly simple and doesn’t require expensive materials. Most of the items you need are likely already in your kitchen or craft drawer. Let’s break it down into two essential parts: what you need and how to make them.

Ingredients
- White granulated sugar
- White school glue (PVA glue)
- Small bowls, eggshell halves, or shallow paper cups
- Paintbrush
- Food coloring or watercolor paint (optional)
- Measuring spoon
- Warm water
- Tray or plate (for drying)
Directions
- Prepare the Geode Base
- If you’re using eggshell halves, gently wash and dry them first.
- Alternatively, use small foil bowls or mini paper cups as molds.
- Apply the Glue
- Using a paintbrush, coat the inside of your mold (eggshell or cup) with white glue.
- Make sure the glue covers all areas where you want crystals to form.
- Dust with Sugar
- While the glue is still wet, sprinkle a generous amount of sugar over it.
- Shake off the excess and let the base dry completely—overnight works best.
- Create the Crystal Solution
- Mix ½ cup of warm water with 3–4 tablespoons of sugar in a separate container.
- Stir until the sugar dissolves. Add a few drops of food coloring for a vibrant look.
- Soak and Grow
- Pour the sugar solution into your prepared mold gently.
- Leave it undisturbed for 1–3 days as crystals begin to form on the surface.
- Dry and Display
- Once crystals have formed, carefully drain any extra liquid.
- Let the geodes dry on a tray before displaying them proudly!
Creative Tips and Variations for Stunning Results
The beauty of sugar and glue crystal geodes lies in how customizable they are. Here are some ways to make yours even more impressive.

Add Colorful Effects
Experiment with different shades of food coloring or even mix colors for rainbow geodes. Using metallic or pearlescent paint adds a stunning finish.
Experiment with Crystal Size
Want chunkier crystals? Try using coarse sugar or even rock sugar for a bold, textured effect. Adjusting the sugar-to-water ratio in your solution can also influence crystal growth.
Why This Project Is Perfect for Kids
Not only does it spark creativity, but it also nurtures curiosity about science. Plus, it’s an excellent sensory activity—kids love touching and observing the glittering crystals up close.
Print
Sparkling DIY Sugar and Glue Crystal Geodes for Kids
- Total Time: 1–3 days
- Yield: Multiple geodes depending on mold size
Description
A fun and educational DIY activity that uses sugar and glue to create sparkling crystal geodes perfect for kids.
Ingredients
– White granulated sugar
– White school glue (PVA glue)
– Small bowls, eggshell halves, or shallow paper cups
– Paintbrush
– Food coloring or watercolor paint (optional)
– Measuring spoon
– Warm water
– Tray or plate (for drying)
Instructions
- – Prepare the geode base by cleaning eggshells or shaping molds.
- – Brush the inside with glue, then sprinkle sugar to coat.
- – Let dry overnight for best results.
- – Mix ½ cup warm water with 3–4 tablespoons sugar; add coloring if desired.
- – Pour solution into the mold and leave for 1–3 days to form crystals.
- – Drain any liquid and allow the geode to dry before displaying.
Notes
Use different colors for rainbow effects. Store in a dry place to prevent dissolving.
- Prep Time: 15 minutes
- Cook Time: 0 minutes
- Category: DIY Craft
- Method: Crystalization process
- Cuisine: N/A