Looking for a magical and eco-friendly craft project that both entertains and sparks the imagination? These Toilet Roll Space Rocket Night Lights are perfect for a weekend activity with kids. Using simple household items, you can turn trash into treasure while teaching kids about recycling, creativity, and a touch of space science.

Whether you’re decorating a child’s room, prepping for a space-themed party, or just having fun on a rainy afternoon, this DIY rocket craft doubles as a charming night light. It’s safe, easy, and totally out of this world.
Crafting the Cosmic Imagination
Why Kids Love Rocket Night Lights
There’s something thrilling about rockets for kids. They’re bold, they’re fast, and they symbolize adventure. Turning a basic toilet paper roll into a shining rocket that lights up at night combines storytelling with sensory play. It’s the perfect blend of art and science, wrapped up in a kid-friendly project.
Plus, the glowing night light function adds a comforting ambiance to any child’s bedroom. When lights go off and the stars come out, your homemade rocket will be ready to launch dreams sky-high.
Sustainable and Budget-Friendly Fun
Toilet roll crafts are a win-win for both the planet and your wallet. By reusing materials you already have at home, you’re teaching kids the value of upcycling. No need for expensive supplies—just a bit of creativity and a few basic tools.
This craft uses recyclable cardboard, colored paper or foil, tissue for flames, and battery-operated LED lights to keep things safe for children. The result? A personalized, glowing masterpiece that kids will be proud to display.
Materials and Method
Ingredients
To make your Toilet Roll Space Rocket Night Lights, gather the following items:
- 1–2 toilet paper rolls (or half of a kitchen paper roll)
- Colored paper (red, blue, silver, yellow) or child-safe paint
- Scissors
- Glue stick
- Aluminum foil (for shiny accents)
- Tissue paper or cellophane (red, orange, yellow for flames)
- Battery-operated LED tea light or fairy light
- Black marker or small stickers (for windows and design details)
Optional:
- Star stickers
- Sequins
- Glitter glue
")
Directions
1. Prepare the Rocket Body
Cover the toilet paper roll in colored paper or paint it silver, white, or any spacey color your child loves. Let the paint dry if you’re going the painted route. This is the rocket’s main body.
2. Create the Nose Cone
Cut a circle from a colored sheet of paper. Snip from the edge to the center and curl it into a cone shape. Secure with glue, then attach it to the top of the roll. This forms the rocket’s tip.
3. Decorate Your Rocket
Let your imagination run wild! Use aluminum foil for metallic panels, add round stickers for windows, and draw fun designs with a marker. Encourage kids to personalize their rocket with aliens, astronauts, or galactic symbols.
4. Add the Fiery Flames
Cut long strips of tissue paper or cellophane in orange, red, and yellow. Glue them inside the bottom of the toilet roll so they dangle like flames shooting out of the engine. This brings the rocket to life.
5. Insert the Night Light
Place a small, battery-powered LED tea light or fairy light inside the roll. These lights are safe, cool to the touch, and make the rocket glow beautifully at night.
6. Blast Off and Display
Find the perfect spot—on a nightstand, shelf, or windowsill—and place your glowing rocket for all to admire. When the lights go off, your mini spacecraft will shine like a star in the sky.
Tips for Creative Launches
")
Personalize with Themes
Take this craft up a notch by incorporating themes. Make an astronaut rocket, alien spacecraft, or galaxy shuttle. Use googly eyes, pipe cleaners, or colored gems to make each rocket unique. If you’re crafting with multiple children, let each child pick a theme and share their creation.
You can even host a mini “rocket exhibit” where each kid presents their design and explains their mission. This adds an educational storytelling element to the fun.
Make It a Learning Moment
Incorporate a bit of science learning into the craft by talking about how rockets work, space travel, or even constellations. This craft can be a perfect launchpad (pun intended) for sparking interest in astronomy and engineering from an early age.
Use the opportunity to read a space-themed story afterward or watch a family-friendly documentary about planets and stars. Turn your living room into a mission control center for an afternoon.
Print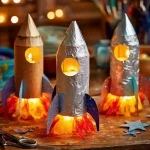
Light Up the Night with Toilet Roll Space Rocket Night Lights
- Total Time: 20 minutes
- Yield: 1 rocket
Description
Fun and eco-friendly Toilet Roll Space Rocket Night Lights made with recycled materials, colorful paper, and LED tea lights. A perfect space-themed craft for kids that doubles as a glowing night light.
Ingredients
1–2 toilet paper rolls (or half of a kitchen paper roll)
Colored paper (red, blue, silver, yellow) or child-safe paint
Scissors
Glue stick
Aluminum foil (for shiny accents)
Tissue paper or cellophane (red, orange, yellow)
Battery-operated LED tea light or fairy light
Black marker or small stickers (for windows and details)
Instructions
Cover the toilet roll with colored paper or paint it silver/white and let dry.
Cut a circle from colored paper, roll it into a cone, and glue it to the top as the rocket’s nose.
Decorate the rocket using foil, markers, and stickers to create windows, stars, or space designs.
Cut strips of tissue paper in red, orange, and yellow. Glue them inside the bottom to form flames.
Place a battery-operated LED light inside to illuminate the rocket from within.
Display your finished rocket night light on a shelf or nightstand and enjoy the glowing ambiance.
Notes
Only use cool-to-touch, battery-operated LED lights for safety. Encourage children to personalize their rocket with names, stickers, or fun space designs.
- Prep Time: 10 minutes
- Cook Time: 10 minutes
- Category: Craft
- Method: Assembly
- Cuisine: N/A