Fall is a magical time of year, with crisp air, falling leaves, and plenty of cozy crafting opportunities. If you’re looking for a fun, hands-on project for kids, this torn paper owl craft is a fantastic way to celebrate the season. It combines creativity, fine motor development, and autumnal colors into a charming owl that kids will love making and displaying.

Why Kids Love This Torn Paper Owl Craft
Engages Little Hands
Tearing paper is a satisfying and engaging activity that children naturally enjoy. It strengthens fine motor skills and encourages coordination, making this craft as educational as it is fun.
Full of Fall Flair
The rich browns, oranges, and whites used in this owl design bring the feeling of autumn indoors. Kids love seeing their art come together in warm, seasonal tones, and this project fits perfectly with fall-themed lessons or home decor.
Materials and Step-by-Step Instructions

Ingredients (Materials You Will Need)
- Construction paper in brown, orange, and black
- White paper (for the owl’s face)
- Googly eyes
- Glue
- Scissors
- Pencil or crayon (for tracing)
Directions (How to Make It)
- Draw the Owl Face
On a sheet of white paper, draw a simple owl face. This can be a circle or oval with large eyes and a beak. If preferred, use a printable owl face template. Add a little color and then cut it out. - Create Torn Paper Feathers
Tear brown and orange construction paper into small pieces. Encourage kids to make pieces of different sizes to give the owl a textured, feather-like appearance. - Assemble the Owl Body
Choose a background sheet, such as black or dark brown. Start gluing the torn paper pieces onto it, forming the shape of an owl’s body. Leave space at the top for the face. - Add Handprint Wings
Trace each of the child’s hands onto brown construction paper and cut them out. These will serve as the owl’s wings. Glue them to either side of the body. - Finish the Face
Attach the cut-out owl face to the top of the body. Then, glue on two googly eyes to bring your owl to life. - Optional Touches
Add a small triangle of orange paper for the beak, or include leaves and branches around your owl for extra flair.

Tips for Making the Most of Your Owl Craft
Adapt for Age and Skill Level
Younger children may need help with tracing and cutting, but they’ll love tearing paper and gluing pieces into place. Older kids can add extra detail, like patterned feathers or accessories like glasses or hats.
Turn It Into a Fall Display
Once your owl is complete, consider hanging it up as part of a fall-themed bulletin board or garland. Add names or messages to personalize each owl for home or classroom displays.
Extend the Learning with Owl Facts and Books
Read Alouds to Pair with the Craft
Complement this activity with fall-themed or owl-focused storybooks. Great options include Owl Moon by Jane Yolen or Little Owl’s Night by Divya Srinivasan. Reading and crafting together creates a rich, multi-sensory experience.
Learn About Real Owls
Use this craft as a jumping-off point to learn more about owl species, habitats, and sounds. Kids will enjoy comparing their paper owls to real ones and might even be inspired to write owl-themed stories or poems.
Print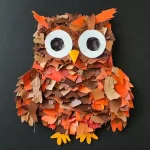
Torn Paper Owl Craft Idea for Fall
- Total Time: 25 minutes
- Yield: 1 owl craft
Description
A cozy and creative fall activity for kids — this adorable torn paper owl combines fine motor fun with seasonal charm!
Ingredients
Construction paper in brown, orange, and black
White paper (for the owl’s face)
Googly eyes
Glue
Scissors
Pencil or crayon (for tracing)
Instructions
Draw the Owl Face: On white paper, draw a simple owl face or use a printable. Color and cut it out.
Tear Paper for Feathers: Tear brown and orange construction paper into small pieces to create a ‘feathery’ texture.
Assemble the Body: Glue the torn paper onto a background sheet to form the owl’s body shape.
Add Wings: Trace your hands on brown paper, cut them out, and glue them on as the owl’s wings.
Finish the Face: Glue on the owl face and attach googly eyes for a fun, animated look.
Notes
You can add leaves, glitter, or even mini pinecones to the background for extra seasonal charm.
- Prep Time: 5 minutes
- Category: Craft
- Method: Paper Crafting